The Mr. Rabbit Magic Show: Walkthrough + All Playing Cards
As a big fan of the Rusty Lake universe, I was excited to play their latest game, The Mr. Rabbit Magic Show. A free-to-play point-and-click adventure game on Steam, it’s a tribute to a decade of Rusty Lake’s mysterious storytelling and brain-bending puzzles.
Players are challenged to complete 20 compelling acts by the mysterious Mr. Rabbit. Each act is a logic-based puzzle that tests your puzzle-solving skills in true Rusty Lake fashion. The puzzles are deceptively clever, yet simple to solve once you know the logic behind them. Whether it’s playing tricks with mirrors, solving sequences of music, or revisiting the classic Houdini act, every trick will test your intelligence.

For players who love to hunt Easter eggs, the Mr. Rabbit Magic Show also provides secret achievements in the form of playing cards that feature characters from the Rusty Lake universe.
After fully playing all 20 acts and finding all playing cards, I have written a detailed walkthrough to help you explore the magical world of Mr. Rabbit. If you’re stuck on a specific puzzle or need to achieve 100% completion, this guide is for you!
Quick Access
Act 1
Click on the magician to zoom in a bit. Then, click on his hat. Click the hat once more, and a magic wand will pop out from it.
Drag the wand towards his right hand (on your left). Click on the hat again, and five colorful balloons will pop out from it.
Click on the balloons in this sequence to burst them one by one:

1. Purple
2. Green
3. Yellow
4. Pink
5. Blue
Act 2
Click on the magician to bring him into focus. Then, click on his hat to see him lower it with a magician’s flair.
Click on his hat to bring it into focus. Click on it once more, and six colorful flowers will pop out from it.
Count the number of petals on each flower and arrange them in ascending order from your left to your right.
The screenshot below shows the correct floral arrangement based on petal count:

Act 3
Click to bring the magician into focus. Click on his hand to your right and watch as five playing cards appear magically. Click on the playing cards to bring them into focus.
Click on each playing card on every shuffle, in the following sequence, to complete the trick:

Ace of Spades
3 of Clubs
7 of Hearts
5 of Hearts
If you love point-and-click adventure games, then check out Follow the Meaning, a short and strange game about a town and its dark secrets. The game was created by the Hiking Mind studio and published by Second Maze, the publishing branch of Rusty Lake.
Act 4
Someone from the audience throws a crumpled piece of paper. Click on it repeatedly to move it away, and then you can start Act 4.

Click on the hat. A hand holding a revolver pops out from it. Click on the top of the screen five times to shoot. Five hats belonging to five different professions drop on the floor.
Click on the magician’s hat again to shoot, and a baseball drops on the floor. Drag and drop the baseball into the striped cap. The logic is to match the items dropped on the floor with the correct profession’s hat. So, a baseball should be dropped onto the baseball hat, and a hammer should be dropped onto the construction worker’s hat.
Baseball – Stripped cap
Hammer – Yellow Helmet
Binoculars – Hunter’s hat
Grenade – Soldier’s helmet
Horseshoe – Cowboy’s hat
Bunny – Magician’s hat
Mr Rabbit will pop out from the hat. Click on him to end this act.
Act 5
Click on the magician. Click on his hat. Click on his hat once more, and a hand with one finger pointing upward will pop out. To solve the puzzle, count the number of fingers shown and click the wand that many times.

The trick starts with a single finger—click the wand once to make the magician wave it once. Next, a hand with two fingers will pop out of the hat. Quickly click the wand twice to match. Keep following the pattern, increasing your clicks to match the number of fingers shown. Be sure to click in the correct rhythm—any delay between two clicks, and the act won’t continue!
Act 6
Click on the tiger to bring it into focus.
1. Wait for the tiger to open its mouth wide. When it does, click and hold the magician’s hand to make him put it into his mouth.
2. Wait for the tiger to open its mouth wide and click and hold the magician’s elbow to put the hand deep into his mouth.
3. Wait for the tiger to open its mouth wide for the third time and click and hold the magician’s shoulder until he puts his entire hand inside the tiger’s mouth.

Make sure you do all this whenever you see the tiger opening its mouth wide.
On the third attempt, the magician finally succeeds in pulling a cute bunny out of the tiger’s mouth. Click on the bunny to end the act.
Act 7
A fly hovers around the curtains. Click to swat it away.
In Act 7, five magic cabinets or “zigzag boxes” will be displayed on the screen. Click to bring them into focus.

Click on each cabinet to see what’s inside—it’s the magician! But his body parts are all mixed up. Drag the cabinets around to put him back together and complete the trick. Make sure you drag each cabinet slightly sideways to align the parts perfectly.
Once you do this, all five magic cabinets close. Click on each cabinet again to make the magician appear….magically behind them!
Act 8
Eight Items are kept on top of a platform. Click on the platform to bring it into focus. You will have to click on the correct item. Clicking on the wrong item will put a popper underneath it and will explode, resetting everything.
But here’s the trick. When you click on the correct item, it switches places with other items. At that time, pay attention to all other items as they may transform into something different or change color.

Click on the following items in this sequence:
1. Box with 1 Written. Notice the triangular cap changes color to blue.
2. Blue Cap. Noticed something changed in the bunch of carrots? More carrots are added, showing some change in it.
3. Bunch of carrots. The position of the blue/white vase changes a bit. It tilts upwards.
4. Vase. The star on the grey box rotates a bit.
5. Star on Gray Box. Pay attention to the candles on the cake. One candle goes missing.
6. Cake. The red hat increases in size.
7. Red Hat.
8. Finally, click on the magician’s hat to complete this act.
Act 9
A mug with Bleh! written on it slides in the middle. Click on it to move it aside. Click on the curtains to begin the trick.
Click on the magician. He is holding a hat, and a second hat is placed on the floor. In this trick, you will have to slingshot the bunny from hat 1 to hat 2.

To play this trick, click and hold on Hat 1, then drag your mouse downward and release to launch the bunny into the air. Aim carefully so it lands in Hat 2! The farther you drag down, the higher and faster the bunny will fly — so make sure your aim and timing are just right! Also, the quicker you release, the slower it will be launched in the air.
Do this three times to end Act 9. In all three tricks, the hat on the ground will be placed on spots.
Act 10
Click on the brown box — the same kind you’ve seen in magic shows, where magicians push swords through it. Seven swords of various sizes appear on your left side.
Pay attention to the numbers, dots, and arithmetic operations ( +) and (-) on the magic box.

On your left, note that the third sword from the top has a red dot on it. The same dots are shown on the brown box. You will have to push swords of the right size into the four slots numbered +1, -2, +3, -1 by comparing their size with the red dot sword’s size based on the numbers.
Example: Push that sword on the o +1 slot that is one size larger than the red dot sword. You can compare each sword’s length with the red dot sword by dragging it over it. Or, simply refer to the screenshot below to see which swords go into which slots.
Act 11
Error codes are repeated multiple times on the screen. Click on the screen to get back to the act. Next, click on the curtain to start Act 11.
The bulb puzzle is quite easy to solve.
Click on the magician’s hand to see it tilt in three directions – Inwards, positioned at a right angle, and outwards.
This is for the first row of bulbs. See the arm positioned at a right angle? It hints at the middle bulb. Click the magic wand to light up the middle bulb. Then, click on the arm to extend it outward. Click the wand again to light up the third bulb. Now, click on the hand to move it inwards and click on the wand to light up the first bulb.

Click the magician’s hat to tip it downward. This will allow you to light up the second row of bulbs; you will be stuck in the first row. Follow the same sequence as you did for the first row of bulbs.
Do the same for the third row, but make sure you click on the hat first; else you will be stuck in the second row.
Note: If the bulb is already lit and you don’t adjust the arm’s position, clicking the wand will turn the bulb off.
Act 12
Mr Rabbit has a new assistant! He wants to give flowers to the bird woman, but the trick here is to only give those flowers that match the ones that adorn her hat.

Drag and drop these flowers towards the bird woman/s hand to complete the magic trick:
Red rose bud
Blue flower
Yellow flower
Orange flower
To discard the purple, red, and white flowers, just drag and drop them.
Act 13
Six hats are placed on the floor. Click each hat to hear an audio clue revealing which animal is hiding inside. After listening to all six audio cues, match and drop the correct food that each animal loves to eat to solve the puzzle. Think carrot = Rabbit, Bone = Dog. Here’s the solution to the puzzle:

Hint: Lower the background music from the settings menu (gear icon) to listen to the audio cues.
Act 14
Click on the magician and then click on his hat. Click on his wand. A blue balloon pops out from the hat. Click on the blue balloon to trigger a critical error message on the screen.

Click ‘OK,’ and another message will appear. If you keep clicking on OK, the critical messages will pile up on the screen.
In the next scene, you see a laptop placed on a desk. Click on the downward-pointing arrow to zoom out.
You are in Rusty Lake’s office, and that’s Robin Ras, the co-founder of the indie game studio, standing next to his laptop:

Click on the arrow on your right to move to the next room. In this room, there’s a display cabinet on your left, an ornate pink armchair on your right, and a vintage gramophone behind it.
Move to the third room – the developer’s room. Click on the whiteboard to see the to-do list. Each task in the to-do list needs to be completed by solving simple puzzles. Let’s begin:

Drinks
Go back to the first room, the laptop room. Click on Robin to chat with him. He tells you there’s a bug in the Mr Rabbit Magic Show game and there’s work needed to do to fix it. But first, let’s have some drinks – Tea for me, please. Make tea for Robin.

Head to Room 3 and click on the empty chair.

You will see some cards piled up on the desk. Click and drag the cards to move them aside and reveal a tea bag underneath. Click the tea bag to pick it up and put it in your inventory, displayed on your right.

Go to room 4. It’s the kitchen. Click on the cabinets to focus on them. Click on the cabinet just above the red fridge to open it. Pick the tea mug.

Drag and drop the tea mug onto the kitchen counter. Now do the same to put the tea bag into the mug.

Drag the electric kettle to put hot milk into the mug. Click on the mug with tea to collect it. Your tea is ready. Go back to room 1.

Drag and drop the cup of tea onto Robin, the co-founder.
In the same room, click on the vintage floor globe on your right to zoom in. Click on the globe again to open the top part. Take the coffee cup.

Head to room 3 again and click on Andreea, Rusty Lake’s Community Manager. She wants coffee.

Go back to the kitchen and click on the white cabinet above the black coffee maker. Click to collect the coffee capsule.

Click on the black coffee maker to zoom in. Drag the coffee cup to place it below the nozzle of the coffee maker.

Drag the coffee capsule onto the coffee maker and click the top switch twice to pour coffee into the cup. Click to pick the cup.
Go to room 3 and give the coffee to Andreea.
In the same room, click on Maarten, co-founder, Rusty Lake. He wants a cold drink.

Go to the kitchen, open the red fridge’s freezer, and pick the can of soda.

Give the soda can to him. Click on him to make him drink it. Click on him again, and he will thank you. That’s it! The first task from the to-do list is complete.
Bug Fixing
Maarten waves at you. Click on him. He says there’s a bug in the game and suggests you take a look at the computer screen to see if you can fix it.

Click on the computer screen. On the screen, you can see a “logic script” with if blocks. At the bottom are clickable word tiles. Click on the right word and then click on the spaces with wrong word tiles to fix the bug in the script. Click on the window behind the script to get hints.
Here’s the solution to the code puzzle. Click on submit.

A window with “Game is ready to be compiled” will appear on the screen. Click on OK.
After the game is compiled successfully, take the pen drive from Maarten. The game script with the correct code is in the pen drive.
How to Find the 4 Digit Password
Go to room 1 and click on the laptop. Drag and drop the pen drive onto the laptop. Click on the laptop screen to zoom in. Enter your name or any other name of your choice. Click on the black space for the name and then click on the letters on the keyboard to punch in your name.

Click “Submit,” then click “Continue.” The laptop now prompts you to enter a 4-digit password.

There’s a piece of paper to your left, next to the laptop. Exit the laptop screen first, then click on the paper to find a clue for the four-digit password.

Make a note of the objects listed under “password” on the paper and take note of their sequence. These same objects are displayed in the cabinet in room 2.
Now, click on the display cabinet. Referencing the order of objects on the paper, click on each object one by one in the same sequence.
TL;DR – The four-digit code is 7285.

1. Antique table clock: Note the time. It’s 7.

2. Black cube: Click on the black cube to reveal a number. It’s 2

3. Crow’s head: Click on its eye and observe the movement of the eyeball as it moves in a figure-eight pattern. 8

4. Old VHS player on the bottom left: Exit the display cabinet and click on the pink chair. Pick the VHS tape.

Click on the cabinet and click on the old VHS player. Drag the VHS tape onto the player to put it in the empty slot. Click on the green play button.

Pay attention to the TV screen. You will see a number in the middle of the static screen. It’s 5.
Go to room 1. On the laptop, enter the four-digit password and click submit. The game will be published. Click on “Continue”.
The Mammoth Trick
Act 14 starts. Click the magician’s hat. Then click his wand — a blue balloon floats out of the hat. Pop the blue balloon, and a giant mammoth crashes down on the magician.

Act 15
A classic Houdini act! Click on the large glass tank to drop the magician—chained, tied, and hanging upside down—into the water. Click to zoom in on him.
Click on one of the locks to release a handful of keys into the water. In this puzzle, you will need to pick the correct keys to unlock all three locks holding the magician in place. Here’s the solution (or see the screenshot below)

Use the key with one blade (or bit – a term used for older keys) to unlock the lock around his legs.
Use the two-bit key to unlock the one around his waist. Pay attention to the bits. This key has bigger 2 bits than others.
Use the three-bit key to unlock the lock around his chest. There’s only one three-bit key.
Click on all three chains and the rope to set the magician free!
Act 16
In this trick, you will have to choose the opposite of what is shown in the mirror.
1. White Rabbit: Click the mirror twice. In the first puzzle, you’ll see a rabbit holding a dark-colored rabbit.
Now click on the magician—eight objects will fall to the floor. Find the white rabbit, the color opposite of the dark one. Drag and drop the white rabbit into the magician’s hand.

Each time you make a correct selection, a new object appears in the mirror. Pick these objects whenever the magician’s evil reflection shows the opposite one.
2. Sun
3. Dumbbell
4. Snail
5. Hot Cup of Tea
6. A Heavy rock
7. Miniature Elephant
8. Rose
Act 17
In this puzzle, your task is to guide the bird from the magician’s black hat to the white hat on the floor. It’s a classic pipe puzzle—with hats! Rotate the black hats to create a path so the bird moves from one hat to the next and finally lands in the white hat. Here, the angle of the hats plays an important part in solving the puzzle.
Check out the correct Hat alignments:

Act 18
Click the wand to change the costume on the magician’s arm—yes, only the arm! Then click on the other parts of the magician’s body to select the full costume that matches the arm’s outfit. Next, click on the magician’s head and choose the right head to light up one of the bulbs.
Here’s a costume-face combination to light up all four bulbs:


Act 19
This is a musical puzzle. Click on the hat placed on the ground to reveal a pigeon. Click on the pigeon to reveal 16 musical notes. Click on all musical notes in the correct sequence so that all remain pressed or grayed out at the end. This is the toughest of all puzzles in The Mr Rabbit Magic Show.
Check out the screenshot below to see how to solve this puzzle. The numbers 1–16 above the musical notes indicate the exact sequence in which the notes should be clicked.”

After solving the puzzle, the pigeon gets a bit plumper. Click on her to turn her into the bird woman. Click on her twice to turn the magician into a rabbit and end the act.
Act 20
Click on the magician and then click on his hat. Click on the hat once more to bring up the magic wand. Drag and drop the magic wand onto his hand on your left.

Click on the hat, and a mysterious black hole pops out of it, floating in the air. Click the black hole to make it fall to the ground. It begins sliding back and forth across the floor. Wait until it’s directly beneath the magician, then click on him. He falls into the hole, and a pink balloon floats up in his place.
Click the pink balloon, and it slowly deflates.

The words “THE END” appear on the screen—but wait, is it truly the end? Not quite!
Click on the screen and then click on “Continue”.
You are back in the Rusty Lake office. More puzzles and secrets to discover!
The same laptop where you entered the 4-digit password to access and submit the game script!
Rusty Lake Anniversary Celebration Puzzles
Click on the down arrow to exit the laptop.
Click on Robin, and he takes a photo of you.

Go to room 3 and click on the to-do list. Let’s complete all tasks in the list.
Lunch
Click on Maarten and Andreea. Maarten is hungry. Andreea chimes in that she wants lunch too. Now, click twice on the man wearing the red coat. He hands you something: the broken door handle from the fridge. Says he found it lying in the hallway. Click to collect the handle.

Go to the kitchen. Click on the fridge. Drag and drop the broken handle onto the fridge door.

Open the fridge. Collect all edible items from the fridge:

– Bread
– Cheese
– Harvey’s egg
– Shrimp
– Salami
In the same room, click on the sandwich grill placed next to the black coffee maker.

Click to open the grill’s top lid.
Drag and drop the bread slices onto the table. Put two slices on the sandwich grill. Add cheese to one slice and Harvey’s egg (an Easter Egg!) on the other. Then, place two more slices of bread on top to complete the stack (Pun intended!).

Click on the top lid to close the grill. Click on the top lid again and collect both toasties.
Again, put two slices on the sandwich grill. Add shrimp to one slice and salami to the other. Place two more slices of bread on top to complete the tosties.

Do the same as explained in the previous paragraph. You now have a cheese toastie, an egg toastie, and a salami toastie.
Give these 4 toasties to all developers in the Rusty Lake office. You can find three people in the third room and Robin in Room 1.
Once you give the fourth toastie, the room is filled with black smoke. Move to the kitchen. It seems you forgot to turn off the grill. The smoke slowly fills the entire room as you navigate from one room to the other.
Keep clicking on the left and right arrows until you see a shadowy figure. Click on the figure and reveal the famous phrase that appears across several Rusty Lake titles – “The past is never dead”.

Click on the arrows again, and you will see a twinkling star. Click on the star. Click on the left arrow, and you will see another star. Click on the star.

Click the left arrow, and another shadowy figure materializes on the screen. Click on it, and it will say, “You know what to do.”

Click on the figure once more, and you’ll find yourself in Room 2. Maarten has put on the crow mask that was displayed in the cabinet.

Click on the crow mask, and the man takes it off, laughing.
Go back to room 3 and click on the to-do list to check out the next task.
Order Birthday Cake
Maarten’s desk is now empty. Click on his desk and then click on his smartphone.

Turn on the smartphone. Click on notes in the top-right corner of the smartphone screen. Now click on the second note. Note down the hint:

“4 photos = mail inlog code”
Go back to the main smartphone screen. If you click on the mail icon, you won’t be able to access it unless you punch in the 4-digit code.
Click on the photo gallery next to the mail and pay attention to all 4 photos, their contents, and their dates.
The objects shown in these four photographs can be found in the display cabinet in room 2. All these objects will help you obtain the 4-digit passcode to access your smartphone’s mail.
Here’s how to solve this puzzle:
First things first, identify the dates on all four photographs and arrange them in order from the earliest to the latest. Here’s the date-wise photo arrangement:


TL;DR The passcode to access smartphone mail is 1639.
1. Go to room 2 and click on the cabinet. Click on the yellow TV. Click on the third button. Note down the number 1
2. Click on the black comic book on the lower right (same as the photo below). Open the comic book. Note down its page number – 6
3. Click on the set of three plushies on the top-left. There’s Harvey the pet parrot, and it is positioned at number 3. The photo hint shows only Harvey, so I am guessing it’s his third position that counts as a digit.
4. The Automaton is at the bottom of the display cabinet. Click on the gear at the bottom of the Automaton to rotate it. Press and hold to keep rotating it until you see the number 9.
Go back to room 3 and access the smartphone mail by entering 1639.
In the mailbox, click on DISCOUNT.

Note down the phone number of Crazy Cool Cakes – 02074. You will have to order the cake by calling them.
Move to room 1. Click on the old telephone.

Dial 02074. Click and hold on a number and rotate to dial.
You get a call from Crazy Cool Cakes. The cake will be delivered in a few seconds. Exit the telephone.
Click on the white door. Open the door to take delivery of the cake. Click on the cake to move it in room 3.
Light The Candles: The Framed Picture Puzzle
Go to room 1 and click on Robin. He is holding the deer skull, hiding his face behind it. Click on the deer, and he says, “Look what I found”. Click on him again, and he requests to light the candles on the cake. To light the candles, you need a matchbox.
Move to Room 2 and examine the framed pictures on the wall.
Click on the large picture in the center to reveal a clue. This picture displays several objects that are also shown in the six smaller photo frames around it.
Your task is to arrange the six surrounding photo frames in the order of farthest to nearest objects, as depicted in the central image.
Drag and drop the frames in a counterclockwise direction, starting from the top frame, then moving to the left, bottom, and finally the right.
Refer to the screenshot below for the correct solution.

Solving the puzzle correctly will tilt the middle picture, revealing a box of matches behind it. Click to collect the matches.
Move to room 3. Click on the cake to move it centerstage. Click on the cake again to take it out of the trolley.

Click on the matches in the inventory and then click on each candle to light them up. When you do this, a slice almost falls apart from the cake. Click on the piece of cake:

Give the piece of cake to Andreea. Just drag and drop the cake on her. Click on her again, and she will give you a brush to clean up the floor.

Office Cleanup
Clean up all rooms before the celebrations take place.
1. Go to room 2. Pick up the crumpled piece of paper and the used soda can from the floor.

2. Go to room 1. Click to slide the carpet on the floor. Click to collect the chocolate wrap.

3. Go to the kitchen and click on the potted plant on the top of the cabinet. Click on it multiple times. It will drop on the floor.

Use the brush to clean up the broken pot shards in the kitchen to add them to your inventory.

Pick the playing card near the broken pot shards. More on playing cards later.
4. In the kitchen, put all these items into the garbage bin.
A key will fall out of the garbage bin. Pick it up.

Birthday Decorations
Use the key to unlock the storage door in the kitchen. Drag and drop the key. Then click on the key on the lock to rotate it and click on the handle to open the door.

The storage contains certain items that will help you in your celebrations.

In the same storage room, take the LP. Click on the party box several times to release all the balloons. You will also obtain birthday flags from the box. Make sure you click the box multiple times until you obtain all flags.
Place the birthday flags on the hooks located on the upper left-hand side of the screen, at the top, as shown in the following screenshot:

You will find the hook in every room. You will have to put the flags only in room 1 and the kitchen.
Move to room 1. Someone’s knocking at the door. Click to open the white door. A guy in a white t-shirt has bought a new record. Click on him, and several guests will enter the office.

Go to Room 3, where the celebration will take place. Click on the cake twice and wait for Robin’s cue to blow out the candles. Click on each candle to extinguish it. Once the birthday song ends, the cake will start shaking —click on it again to reveal Mr. Rabbit.
All Playing Card Locations (Achievements)
Mr. Rabbit Magic Show doesn’t stop at mind-bending tricks and puzzles—there’s a post-credit surprise waiting for you: collectible ‘playing cards.’ These achievements are cleverly concealed throughout the office, with many serving as clever Easter eggs from the Rusty Lake universe.
After the credits roll, click ‘Continue’ to begin searching for all 20 hidden achievements scattered throughout the office.
To view the playing cards you’ve collected, click the gear icon in the top-right corner of the screen (above your inventory), then choose the star tab.
Here’s the list of all 20 collectible playing cards found in the Rusty Lake office:
Jack of Spades (Harvey): In Room 1, click on the picture frame to your right. It’s mounted on the wall above the globe. There’s a card hidden behind it. You will notice a small part of it peeking out from the edge of the frame.


King of Clubs (Albert): In the same room, click on the ceiling light multiple times until a playing card drops from it and lands on the floor. Click on it to get your second playing card.

Queen of Clubs (Rose): In room 2, click on the lower cabinet with sliding doors below the display cabinet. Click on the left cabinet to slide the door and pick the third card.


Jack of Clubs (Corrupted Soul): Explore all rooms until you find a red Mickey Mouse-shaped balloon. Click on the balloon a few times to burst it and pick the fourth card. I found this balloon in room 2, but you may also find it in room 1.

King of Spades (Mr. Owl): In room 2, click on the blue LP cover on the floor. This LP was bought by one of the guests to celebrate the 10th Anniversary. Open the cover and take the LP with the red center label. Put it on the gramophone. A card will slide out of the base of the gramophone. Pick the card up.


Joker 1 (Mr. Rabbit): In room 3, click on desk no. 2 from your left. Beneath the visiting cards, there’s a card named “Best Kept Memory”. Note down the phone number on the card – 31854015026.


Go to room 1, use the wall-mounted telephone to dial the number.
You hear a voice from its marketing director, “Chad Brunswick”. While answering the call, he gives a hint – “Best Kept memory is coming to storage closets all across the country.”
Go to the kitchen,and you will see Chad standing near the storage closet.

Click on him and then click on his glasses and hair. Oh wait! It’s not Chad, but Bob. He gives you a VHS tape.

Head to Room 2 and interact with the VHS player in the display gallery. Eject the ‘Best Kept Memory’ tape if it’s still inside, then insert the new VHS tape given by Bob. Click on the play button.

Watch the screen closely—a card will briefly appear between fast-moving scenes. You will have to be a bit quick in clicking on the card at the right moment, as it disappears quite fast.
In Room 3, click on the monitor. You’ll see two windows: Achievements and Sketches. We’ll come back to Achievements later—let’s focus on Sketches for now.

The Sketches window is behind Achievements, so click on it to bring it to the front.

Ace of Clubs: The Sketches window contains clues for two puzzles. The first sketch at the top hints at the window blinds puzzle. Take note of the formation of all three window blinds shown in the drawing. Replicate the same on the window blinds in the same room. See the screenshot below for the correct window blinds formation.

Exit the monitor and click on all three blinds to get the same position as shown on its sketch. A card will drop on the floor. Click to pick it up.
Jack of Hearts (Mr. Boar): In the same Sketches window, the next clue is for the Retro TV inside the display cabinet in Room 2. You’ll notice the TV has three switches at the top right corner. The sketch shows the switch positions across seven steps. You’ll need to replicate this sequence on the TV.
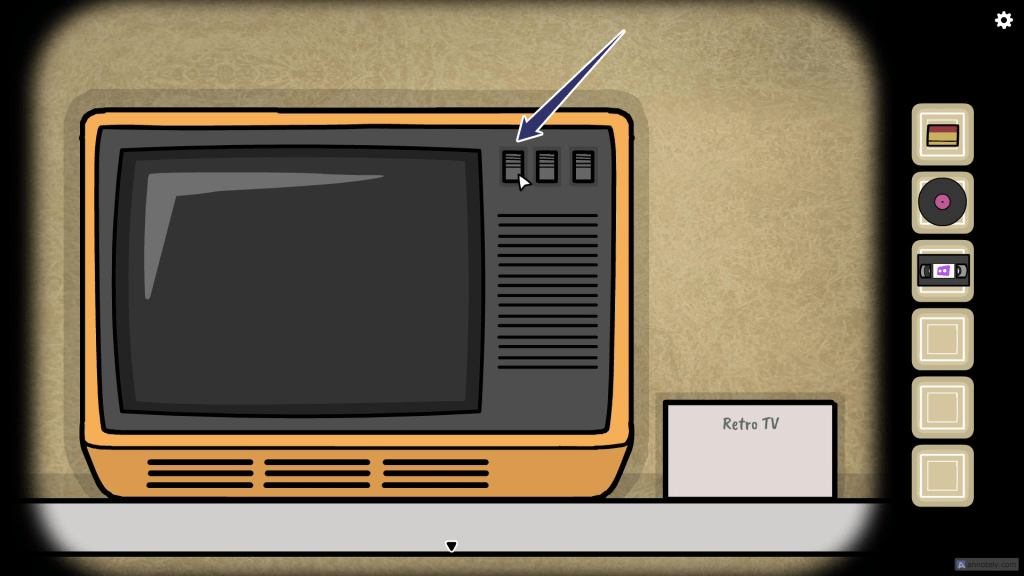
A longer line in the sketch indicates that you must turn that switch on first, then turn it off before moving to the next step. Turning off the same switch after turning it on is an important part of this puzzle.
The table below will help you solve the puzzle.
| Step | Turn On and then Turn Off |
| 1 | Switch 1 |
| 2 | Switch 2 |
| 3 | Switch 3 |
| 4 | Switch 1 |
| 5 | Switch 2 |
| 6 | Switch 1 |
| 7 | Switch 3 |
After the last step, a playing card will appear on the screen. Click on it to add it to your collection.
Ace of Hearts: In room 3, click on the smartphone. Next, click on the Cube Escape game app. There’s a game within a game. How Inception-esque!
In the game, click on the right arrow twice. You are now in a room with a drawer and a cabinet. Click to open the drawer and pick up the card.

Joker 2 (Mr. Rabbit): Stay on the smartphone and tap on the mailbox icon. Click on the first “New Safe” message. As per the message, a new safe is installed behind the frame. To access it, “hit the hotel a few times”.

The second “New Safe” message on the mailbox shows a code to open the safe – It’s 7285, but it’s more difficult than you think. So, you can’t just enter those 4 digits to unlock the safe. There must be some kind of trick to do all this.
Go to room 1 and click on the “Rusty Lake” picture frame. As per the instructions, click on the hotel a few times, and the frame will fall off, revealing a hidden safe behind it.

Noticed something peculiar about this safe? The buttons are blank! There are no digits on them. But the mailbox message gives us a code – 7285. Head to room 3 and click on the display gallery.
You might recognize the number 7285 from Act 14 in this walkthrough. This was the password used to access the laptop. We originally found the four digits by examining four different objects placed in the display cabinet. Now, all you need to do is just note the positions of the same objects within the cabinet and press on the corresponding buttons in the same sequence, 7-2-8-5, on the safe. Notice that the entire frame of the gallery is quite similar to the button layout on the safe. The screenshots below provide a better picture:
Display Cabinet:

Safe:
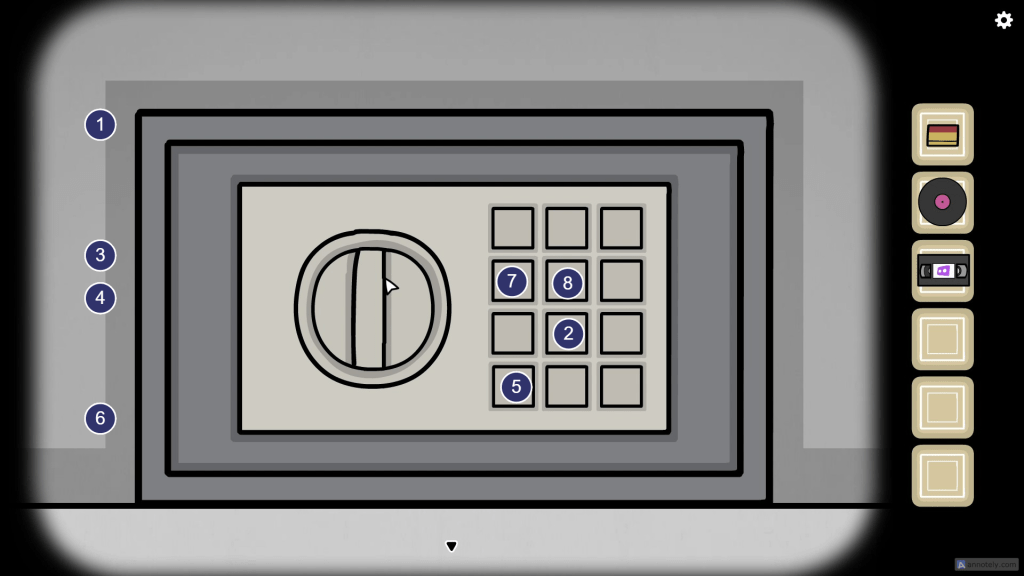
After pressing the right buttons. Click on the knob to open the safe. Take the Joker card and a red pen drive.
King of Hearts ( Mr. Deer): In the same room (1), click on the laptop table.

There’s a file kept on the table. Click to open the file to read its contents. Move aside two posters to find another playing card.

Queen of Hearts: In room 3, click on the Easel. There’s a card at the bottom of the painting named “Rusty Laker of the Month”.

In room 3, click on the computer monitor. The Achievements window provides 4 hints to get four playing cards. Let’s finish them one by one:
To complete the tasks shown in the Achievements window. Go to the room. Click on the laptop and click on the acts mentioned in the code lines. Repeat the tricks as instructed in the code to get the cards.

King of Diamonds (Dale)
var lightArrayLevel11: The code “lightArraylevel11” shows 0s and 1. The “level11” is Act 11, and the 1s in the array represent the bulbs that need to be turned on. Refer to Act 11 in this walkthrough to learn how to solve the bulb puzzle. Be sure to turn on only the bulbs that correspond to the 1s in the array.

For the two bulbs in row 1. Click the hand to move it inward and then click on the wand to light up bulb 1. Click on the hand to move it outward, and then click on the wand to light up bulb 3.
Click on the magician’s hat twice to move to row 3. Now click on the hand to position it at a right angle. Click on the wand to light up the middle bulb.
Jack of Diamonds (Bob)
//Do rabbits eat fish? (Act 13): In Act 13, put the fish into the Hat where the rabbit is hidden. It’s the second hat from your right. First, put the carrot in rabbit’s hat, then put the bone in dog’s hat, which is the second hat from your left. Finally, put the fish in the rabbit’s hat. A hand will pop out from the hat, holding a card.

Queen of Diamonds (Laura)
//Don’t let the bunny die! (Act 9): This is one of the most frustrating acts! You need to successfully launch the bunny into the hats three times in a row. If the bunny falls to the floor at any point, you’ll have to restart the entire act.

Ace of Diamonds
//Does he have an ace up his sleeve? (Act 3): Click on the magician’s right sleeve (on your left) to retrieve the playing card.

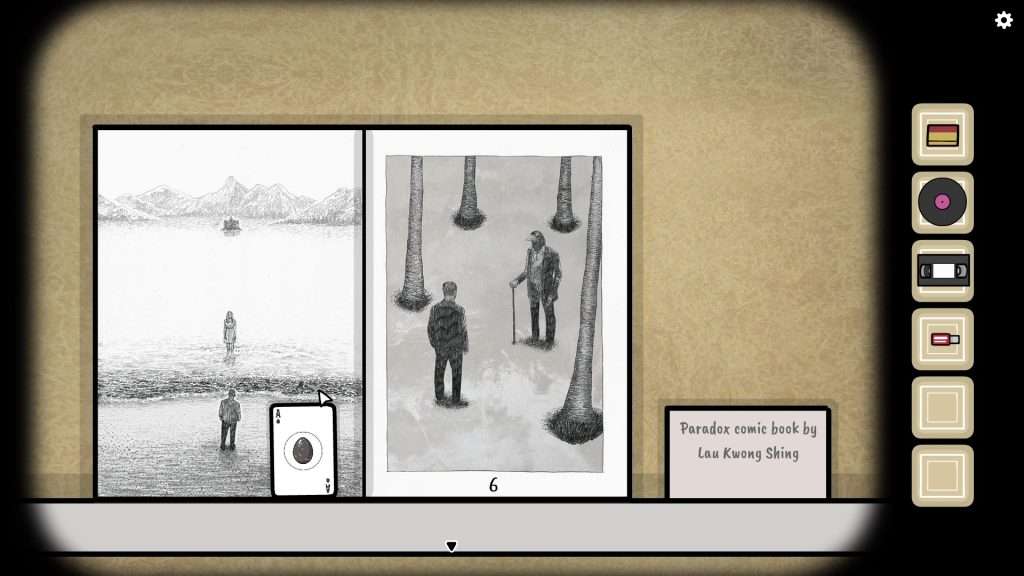
Ace of Spades: Go to room 2, click on the display cabinet on your left. Click on the black comic book in the lower right corner. Open the comic book and get your card.

Queen of Spades (Mr. Crow): You may have found this card before the credits. Head to the kitchen and click on the potted plant on top of the cabinet several times. It will fall and shatter on the floor, revealing a card hidden inside the broken pot.