Pixelshire Guide: Tips to Get Started
Pixelshire is a cozy sandbox-style game from Kappa Bits and Merge Games. You will be quite familiar with its mechanics if you have played games like Stardew Valley and Sun Haven. The game has farming, crafting, potion-brewing, casting spells, and combat. One noticeable aspect of this game is the ability to terraform the landscape. You can elevate land to create hills, build artificial ponds for water farming, and have complete freedom to customize the town layout. There are tons of exploration opportunities as this open world game features various biomes, such as forests, beaches, caves and many more.
Despite all the negative reviews on Steam, Pixelshire is a charming game with a lot of potential, and I’m excited to see how future updates will continue to improve it. If you are just starting, this basic guide will be helpful in your journey.
Quick Access
Character Creation Screen
Pixelshire has a minimalist character creation screen. You can change the skin hue, change hair style/color, and choose a color of your choice for your character’s eyes. You can also customize your character’s costume, change their color,s and styles.
After customizing your character’s appearance, enter your name and click on “Start” to begin your adventure.
Getting Started
Like most cozy games, Pixelshire has a detailed HUD, making it easy for players to navigate to various menus, track NPCs, and know their stats. Here’s the HUD at a glance:
HUD
Health / Stamina / Mana Bars – Show the player’s current stats. Health decreases during combat if your character is attacked. Mana is required to cast spells. Your character’s stamina decreases every time he performs some activity, such as foraging, farming, chopping, mining, etc. You can eat food to restore stamina or sleep at the guest house in the town hall to restore 100 percent of stamina.
Compass (NPC Location) – Helps track characters/NPCs on the map.
Current Season – Displays the in-game season (e.g., Summer).
Total Coins – Indicates the player’s current amount of money.
Days – Shows the in-game calendar or current day.
Task Box – Lists current quests or objectives.
Close Task Box Button – Minimizes the task list.
Character Page (TAB) – Opens the character’s stats and info. More on this in the next section.
Crafting Menu (G) – Opens the menu to craft items.
Bag / Inventory (B) – Opens the inventory where items are stored.

Character Page
Press Tab or click on the lower-right corner of the screen to access your character’s page.
In the first tab titled “Character”, you will see your character’s stats (Health, Defence, Stamina, Mana, Speed, and Poison).
All tools equipped to your character are shown in the Tools menu of your character’s page. A green bar beneath each tool represents its durability. A tool’s durability decreases every time you use it. Once the durability reaches its lowest point, the tool breaks. You can purchase tools from NPCs or craft them at the workbench.

The inventory section displays all items you have collected/crafted/foraged so far. The blueprints you obtain from NPCs are also displayed in this section.
Talents
A part of your character progression system, the Talents section lets you improve your character’s professions and skills, such as farming, woodworking, mining, cooking, combat, and magic skills. Press Tab and go to the Talents section. You will see various categories. As you progress, you will earn talent points, which can then be invested in these categories to unlock certain skills in the skill tree. Example: Under Mining, if you invest talent points to unlock the first skill, i.e., Refined Pickaxe, you will mine more ore from rocks.

Every town member has something to teach you about their profession. Margarita teaches you about farming, Jack teaches about woodworking, and Bron gives valuable advice on mining. You will earn talent points every time you learn something from them. As you progress, you will earn more points as you increase friendship with them by giving gifts. Completing quests, leveling up, doing jobs, and finishing story missions are some other ways to earn talent points.
Controls
Move your character around with WASD keys. Move closer to an object and press E to interact with it.
After acquiring firewood from Capt. Farell, press B to open the inventory. Click on the fireplace. Drag and drop the firewood onto the fireplace slot and click “Fire Up”.
Move closer to the bed and press E to interact with it. Sleeping not only passes in-game time but also saves your progress. Before constructing your own house, you will be staying in a guesthouse at the town hall, where you can sleep and save your progress.
The compass on the top of the screen shows the current location of an NPC. You can also find the location of an NPC in the task box shown on your left. For example, to find and meet Eva, the Mayor, you will have to head north. You can take the help of the compass that shows the correct direction to find Eva.
To consume health potions, press B to open your bag. Right-click on the potion to consume it.
To harvest plants, move near a plant and press E to interact with it.
Basic Farming Tips
While talking to Margarita, you will obtain a wooden hoe. Press B to open the bag. Right-click on the hoe to add it to the tools’ menu.
Press Q to open the tools menu. Left-click on the hoe to equip it. Use the hoe on grass tiles by pressing the left mouse button. Just step away from a grass tile and then click on it to create some farmland.
Buy some seeds from Margarita. Move near her and press E to interact with her. On Margarita’s page, click on the shop tab at the top. From the list of seeds, select the one you want to purchase and press the Buy button. Keep an eye on the amount of gold you currently have on the same page. Click on the seeds image multiple times if you want more seeds to buy.
Press B to open your bag. Drag and drop the seeds onto the farmland to plant them.
You will get the water can from Margarita during the farming tutorial. Fill the can with water only from rivers, lakes, and wells.
Open your bag and right-click on the water can to add ii to the tools menu. Press Q to open the tools menu and left-click on the water can to equip it.
There’s a river on your left-hand side, near Margarita’s house. Move closer to the river and click on it to fill the can with water. To water the plants, just move near the farmland where you planted the seeds and click on it.
Note: Each crop takes a specific amount of time to grow, and you’ll need to water your plants every in-game day to help them thrive. To find out which season a seed grows in, head over to Margarita and press E to interact with her. A menu will appear—click on Shop, then select any Seed. You’ll see the seasons it can grow in displayed at the bottom-left corner of the screen. For example, Cabbage Seeds can be planted in any season, while Tomato Seeds grow only during Summer.
How to Make a Pond
One of the highlights of Pixelshire is terraforming. You can terraform grass tiles to make ponds or even elevate land to create hills.
After learning basic farming from Margarita, go to Capt. Farell and talk to him. Obtain the shovel from him. Press B to open the bag and add it to the tool menu by right-clicking on it.
Press Q to open the tools menu and select the shovel. Use the shovel to start building a pond. Click on a grass tile three times to create a small water body. In the task given by Capt. Farell, you will have to make a 6- tile pond.
With the shovel selected from the tools menu, click thrice on a tile to create a water body. Do the same for the adjacent 5 tiles until you create a small pond.
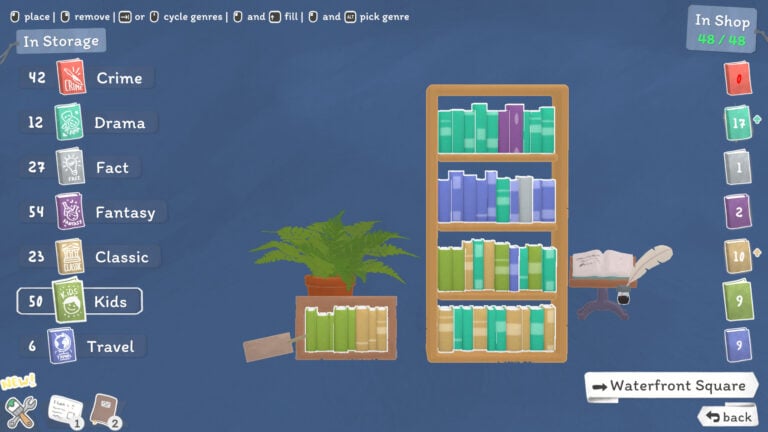
To make the pond smaller, Pixelshire, use the same shovel, but this time, choose the fill option from the HUD, located at the bottom-left corner of the screen. Click on a pond tile twice to convert it into land.
See the screenshot below to know various options using the shovel. Click on an option or press the R button to change:

Elevate the Terrain
This is where the fill option will come into play. With the shovel till selected, click on the fill or elevation (see the above screenshot) option in the bottom-left corner of the screen.
Left-click on grass or land tiles to elevate the ground. You will be creating elevated tiles when you click on flat terrain. Elevate six tiles to create a small hill near the pond.
To get up the hill, you will need to make a slope on one of the elevated tiles. Click on the third option in the bottom left corner of the screen to choose slope. Move near to an elevated tile and click on it to create a slope. You can now get up the hill.
Tip: You can use the shovel to find buried treasure and gold coins. Use it on “flat terrain “digging spots, and you might find one if you hit the right spot.
The screenshot below shows digging spots where you might find buried treasure. These are small mounds on the ground:

Water Farming
Did you know that you can do some cool “water farming” in Pixelshire? This feature lets you grow and harvest rice.
After learning how to use the shovel from Capt. Farell, go to Margarita’s place. She will introduce you to water farming. If you can’t find her outside, move into her house.
Move near her and press E to interact. When Margarita’s page pops up on the screen, click on the shop and purchase rice seed. Make a note of the season in which they grow – It’s summer. You can plant them only in water.
Move to the pond you just created using your shovel. Press B to open your inventory/bag. Drag and drop the rice seeds onto the pond tiles to plant them on water.
Work Bench
How to get the Work Bench
On Day 3, talk to Eva and obtain the house blueprint from her. Find and talk to Jack. He is the town’s lumberjack. Use the compass on top of the screen to know his location. Get the axe from him to chop down some trees for acquiring wood.
Follow the same steps to equip the axe – Press B to open the bag. Right-click on the axe to put it in the tools menu. Press Q to open the tools menu and click on the axe to equip it.
Equip the axe to your character, then click repeatedly on a tree to chop it down. Move near the wood pieces to collect them automatically. Make sure you close the Bag (B) before using a tool.
Jack will also give you a spare workbench. The bench will allow you to use raw materials, such as wood, to craft them into useful items. Use the workbench to craft “wooden planks” using wood pieces.
Placing the Work Bench
Press B to open the B. Drag and drop the workbench onto grass tiles. Make sure no objects are obstructing the placement of the workbench. I created a hill and placed a workbench on it. Here’s how you can do it:
Use the shovel and choose fill (elevation) from the three options at the bottom of the screen to make a small hill. Make sure you elevate 9 or more tiles to create a hill, so that the workbench can easily be placed on it. Place the workbench on the hill, but before that, don’t forget to add a slope to one of the elevated tiles so that you can move up the hill and access the workbench.
How to Make Use of the WorkBench
To start working on the workbench, move near it and press E to interact. To craft an item, click on its icon in the list of items on your right. Check the “Materials Needed” section on the lower right corner of the screen to see whether you have enough materials available to craft that item. Example: To craft a single wooden plank, you will need 2 wood pieces.

Next, use the arrow keys on the bottom to select the quantity of items that you would like to craft. You can set the max qty., as per the number of materials available with you. Next, click on the “Craft” button to begin crafting the item. It will take a few seconds to craft a plank. The time required to create items on a workbench is shown next to the “Craft” button.
Things That Can be Crafted on the Workbench
At the time of writing this guide, the following items can be crafted on the workbench:
| Item Name | Materials required to Craft | Time Taken to Craft |
| Wooden Plank | 2 Wood | 3 seconds |
| Yellow Pine Wood Plank | 2 Yellow Pine wood | 3 seconds |
| Small Wooden Chest (16 slot) | 6 Wood | 5 Seconds |
| Wooden Chest (32 Slot) | 6 Wood, 4 Planks | 10 Seconds |
| Iron Chest (40 Slot) | 6 Wood, 4 Iron Bar | 15 Seconds |
| Small Pot (Decor) | 1 Wood, 1 Wooden Plank | 2 seconds |
| Pot Small Round | 1 Wood, 1 Wooden Plank | 2 Seconds |
| Big Pot | 1 Wood, 1 Yellow Pine wood, 2 Wooden Planks | 2 Seconds |
| Paper | 2 Yellow Pine Wood | 2 Seconds |
| Additional Work Bench | 10 Wood | 10 Seconds |
| Wooden Hoe | 2 Wood, 2 Wooden Plank | 2 Seconds |
| Wooden Watering Can | 2 Wood, 2 Wooden Plank | 2 Seconds |
| Wooden Shovel | 2 Wood, 2 Wooden Plank | 2 Seconds |
| House | 10 Wood, 10 Wooden Planks, 6 Copper Bars, 4 Stone Chunks | 20 Seconds |
| Wooden Axe | 2 Wood, 2 Wooden Planks | 2 Seconds |
| Wooden Pickaxe | 2 Wood, 2 Wooden Planks | 2 Seconds |
| Furnace | 12 Wood, 6 Wooden Planks, 6 Stone Ore, 6 Copper Ore | 60 seconds |
| Wooden Hammer | 2 Wood, 2 Wooden Planks | 2 Seconds |
Mining
Find Bron in the caves. Use the compass on the top of the screen to find the location of the caves in the northeast.
Go deep into the caves and talk to Bron. He is a bit grumpy and has a task for you:
Find the pickaxe: Here’s the location of the pickaxe in the caves:

Equip the pickaxe. Read the basic farming tips in this guide to know how to equip tools.
Use the pickaxe to collect stone and copper ores. The color of ores hints at the materials that can be mined from them.
Red rocks = copper ore. Brown Rocks = Stone Ore.
Copper ores are uncommon, so you will acquire fewer copper ores when you mine those red rocks. You will also obtain stone and coal ores while mining for copper ores.
After equipping your character with the pickaxe, click on the colored ores repeatedly to mine them.
Here’s how to find the gold bar:
Break these two stone ores that are blocking your path:

Access this path and go downwards until you find a shiny piece of metal. That’s the gold bar Bron has been searching for!

Talk to Bron. He will give you the pickaxe as a gift and also give you the blueprint of the furnace. The furnace is where you can smelt the ores to craft iron and copper bars.
How to Craft the Furnace
Go back to your workbench. Press E to interact with it. Under the “Crafting” tab, choose a furnace from the list of items on your right. When you click on the furnace icon, it will be displayed in the top-left corner. Now pay attention to the materials needed for the crafting furnace:
- 12 wood pieces.
- 6 wooden planks
- 6 stone ore
- 6 copper ore

To craft 1 single wooden plank on the workbench, you will need 2 wood pieces.
Once you have acquired the required materials, click on the Craft button. It will take 60 seconds to craft the furnace.
After crafting the furnace, you will need to place it on the ground. Press B to open the bag. Drag and drop the furnace from the bag onto the space free from any blockages or obstructions.
Note: When placing an item or a building, such as the furnace, onto the ground, a red highlight indicates that something is blocking its placement, while a green highlight means the item can be placed successfully.
How to Use the Furnace
Move near the furnace and press E to interact with it. At the time of writing this guide, one can craft a stone chunk and a copper bar, but as you progress, you will be able to unlock more items.
Whether you’re crafting a stone chunk or a copper bar in the furnace, you’ll need “coal ore” as fuel to keep the furnace burning. You can also use wooden planks as fuel.
There are high chances of acquiring coal ore while mining copper ore at the caves, although you may get coal ore while mining stone ore. Get the pickaxe from Bron and start mining to get all the raw materials. Craft wooden planks at the workbench.
Before starting the furnace, make sure you have enough materials to craft stone chunks and copper bars. To craft a single stone chunk, you will need 4 stone ores. To craft a copper bar, you will need 2 copper ores.
1. To start the furnace, click on “Add Fuel”. Next, select the item that you want to craft. Make sure you have acquired enough materials to craft that item.

2. Choose “Coal Ore” or Wooden Planks and press the Select button.

3. Choose the quantity. of items that you want to craft. Quantity depends on how many raw materials you have.
4. Check the “Fuel Needed” section to know how many coal ores/wooden planks you will need to craft an item. For Stone Chunks and Coppet bars, the minimum is 3 Fuel. You can add more than 3 fuels to the furnace.

5. Click on the “Add Fuel” button three or more times to fuel the furnace.
6. Click on the Craft button to begin crafting the item.